Wednesday, July 20, 2011

depowering the nissan steering rack

There are numerous guides online that show you how to 'depower' your steering rack. The 240sx, Miata and other forums are full of folks who rave about the increased road feel and the telepathic like connection to the road. My steering rack was covered in oil and had been leaking for years though it had not leaked much recently. That was good enough reason for me to give it a try. I'll give my impressions of the swap at the end of this post.


Put an oil pan under the steering rack to catch the spill and undo the electrical connection and the two hose connections from the steering gear.


Loosen the tie rod nut and smack the knuckle with a 5lb sledge to dislodge the tie rod without ruining the boot.


Use your cool guy extension as much as you can. Here it is loosening the steering column connection. It is a good idea to lock your steering wheel in the center position before starting all of this.


Remove the bracket attached to the firewall that holds the power steering hose that comes from the power steering pump.


Wiggle the power steering hose up and out into the engine compartment.


Disconnect the other power steering hose from the reservoir that goes toward the radiator.


Connect the two hoses using a hose clamp. This procedure is called 'looping' the power steering hoses. On the Axxess, the power steering pump is not easily removed as it is part of the serpentine belt system which is hard to modify. Instead, looping the lines like this keeps the lubricating power steering fluid circulating inside the pump so it doesn't seize.
It may be possible to remove the fluid reservoir and all the hoses and make a much smaller loop or even seal the pump outlets while keeping the pump full of fluid. Removing the small paddle shaped vanes inside the pump may also be an option. There are probably better solutions like a custom idler pulley to replace the power steering pump or making modifications that allow rerouting the serpentine belt to bypass the pump.


If you loop the lines as we did above, there would still be fluid and a piston inside the steering rack that would mask the connection to the road we are seeking. It would also increase resistance making the car very hard to turn, according to the forums at least.
So instead we will remove the rack and remove the piston inside, repack with grease and seal it.
Remove the brackets holding the rack to the firewall. You will need to go at this from multiple angles with multiple tools. Here is the 'wobbler' extension on 1/2" breaker bar in use. Again, that twist handle ratchet would really come in handy on this one. One more excuse and I'll have to buy one.


The manual says to mark the steering position on the gear. This is not super critical as it will need realignment anyways. As long as the wheel is locked in the center and the tires are pointing straight when reassembling, the rest can be made up at the tie rod adjustments, and will need to be anyway.


Pull that puppy out!


Cut the old rubber boots off and clean things up. The tie rod ends should not flop around easily but as long as they don't rattle around they should be serviceable. The tie rod end needs to come off but first the retainer clip will need to be drilled out where it is 'staked' in place, two times on each side. You will not hurt the threads with the drill so go crazy.


You'll need two big, thin wrenches to undo the tie rod end. A large crescent wrench is probably too wide. This is a 30mm and maybe a 22mm.


Undo the 3 weird bolts with a regular socket and remove the cover.


Remove the pinon gear observing the paper thin washers and their orientation.


Remove the adjusting nut and plunger, spring and washer noting their positions.


Reach in with some pliers and remove the black bushing that presses against the steering rack which keeps it from wobbling and provides resistance. You will need to readjust this when reassembling to have a very slight pressure against the steering rack. Don't over tighten the lock nut as it's difficult to loosen when installed.


The steering rack tube must now come apart and it is also staked in place like the tie rod ends. The drill was tried at first but it left too many burrs which made it impossible to unscrew. In the end a grinder with a cut off wheel was used to remove the whole area cleanly. Be careful though, the grinder leaves behind a deadly sharp sliver of steel just waitin' to cut ya'. A file is advised to smooth the area.


A large vise and a monkey wrench were used to twist this bad boy apart.


And here is the culprit, the inner piston seal that must be removed to allow access into the true manual steering club.


Grind that puppy most of the way through on 2 sides.


Then smack it with a BFH. Ahh the sweet sound of success.


Grease up the rack with your favorite lube, moly grease in my case. Use as much as you think you need then add a little more. Grease up the pinion too. Slap the whole assembly back together and center the rack by counting gear turns or using the measuring method from the manual.


The tie rod ends need to come off to get the new boots on. Here they are marked with the side and number of threads showing to help with realignment.


New, cheap dust boots with decent warranty. The boots are easy to swap by just removing the tie rod end.


The holes are sealed with some RTV.


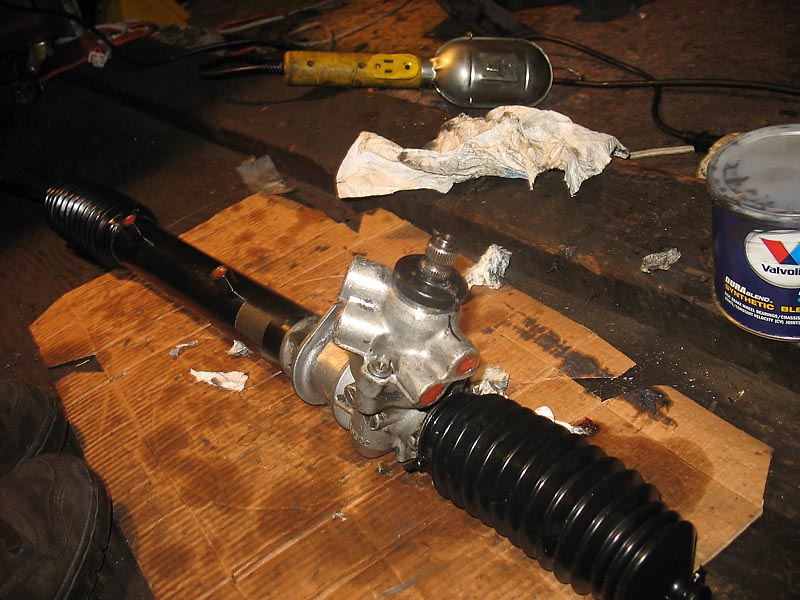
And here it is ready to be re installed. Now may be a good time to get some new steering rack bushings as well.


So how did it work? In a word, crappy.

Needless to say, it was very difficult to turn at slow speeds, requiring grabbing the wheel by the inner edge and cranking it hand over hand. It was manageable in parking lots as long as the wheels were moving before turning the wheel..which takes up space making everything a 3 point turn. Fine in a parking lot but not when flippin' a bitch on a busy narrow road with a truck coming.
At speed the steering was pretty good and I was feeling the improved connection with the road. I was pushing the speeds higher on freeway ramps and really felt as if handling was improved but in reality, my overall cornering speeds were slower than with the power steering and they just felt faster as the car was so much harder to turn. I also lost some confidence in my cars steering ability when approaching high speed corners as I just didn't know how it would react.
The car really wants to recenter itself without the power steering. Taking a long tight corner or navigating a traffic circle becomes a two handed death grip trying to keep the car at full lock, fun, for a while. The adjustable plastic bushing that presses against the steering rack can ease this recentering at the cost of overall resistance. A fine balance with diminishing returns. 

I drove the car like this for a few weeks and decided it wasn't safe for me. It was clear to me that quick, unexpected emergency moves would be difficult or impossible depending on my grip on the wheel. I also determined that in the case of a blowout, especially on a front tire, that I would be unable to keep the car straight and away from other cars or obstacles.
Because of these reasons, I decided to swap back to the stock power steering. I found a Stanza steering rack at the junkyard for $12 which is the same as the Axxess, and it had no leaks, just torn boots.

I was very happy to have my power steering back and will not try that agin, at least in an Axxess. I also own two rear engine cars that have manual steering and they are fine. I can imagine a RWD Miata or 240sx could benefit from depowering the rack in certain situations and i've even heard some Hondas and other FWD guys who love (or say they love) their depowered racks. Maybe it's just me or maybe the Axxess is just not the best candidate for this mod, maybe I'll try a turbo instead.

Tuesday, July 19, 2011

DIY CV joint replacement

My CV joints were clicking when turning hard at slow speed for about 13 years, maybe longer. The axle boots were torn and the CV bearings were clearly visible though they were still covered in grease. It was high time for a replacement on both sides.


You will need to drain the transmission fluid first which is best done when it is warm. Be sure to inspect the fluid for metal shavings. Get your new CV axles or remanufactured ones. Be sure to get a good warranty in case the axles are not straight. It's also a good idea to do a critical evaluation of your front suspension before the swap to see if it changes afterward. Look for pulling to one side under acceleration or vibrations.


Next up, loosen the 30mm nut on the front wheel before jacking the car up. You may need a good 1/2" breaker bar to do this and an extension pipe.


Place the nut on the end of the threads to protect them and tap the axle end with a hammer to dislodge the axle from the hub. A block of wood can also be used.


The manual says to simply unbolt the tie rod to allow the axle to be removed. You generally will not need a tie rod removal fork which may wreck the rubber boots. Instead, loosen the tie rod nut and leave it on to protect the threads, then smack the part of the steering knuckle holding the tie rod stud with a hammer, hard. The tie rod should pop right out. Sometimes you need two hammers, one from each side. Careful not to hit any threads.
We had the strut unbolted from the knuckle already so the tie rod was left in place and the CV slipped out as shown.


The drivers CV axle is pryed out with a crowbar right at the transmission. You can see why the transmission needs to be drained first. That yellow thing is a jack stand, ignore that.


The passenger side axle has a support bracket that is a little tougher. The support bracket is bolted to the engine and shown on the left side of the picture. The blue line is the seam between the CV axle and the bracket. The three bolts holding them together are first removed then use a hammer to hit where the red dots are to loosen the cv from the bracket.


This is the part that was inside the bracket. You can see the rust was holding it in there. Even after it was loose, I had to pull hard on the CV axle end to get it disengaged from the bracket and transmission, even using the bearings in the CV axle like a slide hammer to force it out.


Be sure to swap the nuts, washers and dust shield to the new axles before you return the old ones for the core charge.


The three bolts on the passenger side bracket can be tricky to get to. Extensions, wobblers and patience will help with most situations. This would be a realy great job for one of those twist handle ratchets in case you always wanted one.


 A little grease on the outer splines should help them from getting stuck next time, or not. You can coat the inner splines with transmission fluid to help them seat properly, don't forget to fill the transmission with new fluid as well. You may need a length of rubber hose to connect to the filler bottle in order to reach the transmission fill hole. 


 Thats it, slap it all back together again using torque values from the shop manual. You shouldn't need an alignment if you only undid the tie rod ends. Your test drive will allow you to compare the performance to how it rode before. My passenger side axle made a couple clunks at first but is quiet after driving a few times. Speaking of quiet, no more click, click, click, click...

Friday, July 8, 2011

High Flow Axxess Exhaust

This factory exhaust provides extra airflow to help cool things. It sounds fast too.


Thursday, July 7, 2011

first axxess video up at youtube

I posted a video that shows the removal of the top strut bolt without using spring clamps first.
You will need the spring clamps to reinstall the springs, unless you plan on installing lowered springs that barely fill the space between the perches.

Thursday, June 23, 2011

rear disk brake upgrade

The previous article discussed the choices in rear disk upgrades, now we'll put it together and see if it works.

The parts for this include:
89-94 (gen3) Maxima rear struts with disk brake brackets
89-94 Maxima caliper brackets and calipers
89-94 Maxima brake pads
89-94 Maxima parking brake cables right and left
4 lug hubs from Axxess or Stanza
93-01 Altima 4 lug rear rotors


You will also need the backing shims for the pads, the slider/guide shims for the pads and possibly the top shim for the caliper that presses the pads down into place. You can buy the complete hardware kit for a 89-94 Maxima for about $16 or clean up the old stuff if you have it. Some higher end pads have internal backing shims but the guide shim things are still required. The width of the guide shims is different for gen2 and 3 Maxima but they swap out fine.


The parts store had the wrong pads for a gen3 Maxima so I had to get a pads for a gen2 Maxima. The product numbers for the gen2 pads and 93-97 Altima rotors that fit from Autozone are below.


If you pulled your own parts you can probably figure out the installation but we'll go over it here for good measure. The tools you'll need are simple, the impact gun is not required, the breaker bar is. You'll also want some vise grips and heavy pliers for swapping the parking brake cable brackets.


Start by loosening the 30mm wheel nut and lug nuts with the car on the ground. Jack the car up and support with jack stands. There is a jack point in the rear center but I use the points near each wheel instead. Careful not to use the body as it will bend, see picture below.


Remove the wheel.
Release parking brake handle.
Use 8mm bolts to pop the stuck drum off if needed.
Remove 30mm nut and hub.
Tear out old drum brake crap. remove drum backing plate and e-brake cable.
Disconnect brake hose with flare nut wrench and place container below to catch spill.
Disconnect lower suspension linkage but leave main horizontal pin slightly engaged to hold up the strut.
Axxess the strut upper nuts below the rear speaker grille and rubber boot. Remove nuts.
Remove horizontal pin and catch the 25 pound strut before it hits your toes.


The base of the gen3 Maxima strut is wider where the horizontal bolt goes so you will need to make sure you get the wider horizontal bolt along with the strut. The Axxess bolt is too short.


Use a jack to slowly lift the strut into place while guiding the upper strut studs into their holes. Slap it all back together using the new parts and getting torque values from the Axxess manual available in the links section here.


Clean the new rotors with soap, water and brakleen. Apply a small amount of brake grease to the underside of the rotor where it contacts the hub to help it from getting stuck next time. Remove the caliper pins and inspect the boots for leaks then apply a generous amount of grease to the pins and reseal the boots onto the caliper bracket. Apply grease to the brake pad guides making sure no exxess gets into pads or rotor. Also apply brake grease to edge of pads where it contacts guides and use either grease or brake quiet on the backs of the pads where they contact the piston/caliper. The Axxess manual shows how the brake shims are to be installed on the backs of the pads in pairs but getting one on each pad is better than none.


And here is the final assembly !


The stock spare tire still fits this rear disk upgrade but does not fit the front disk upgrade posted earlier at this blog.


Next, lay the Axxess parking brake cable beside the new ones from the Maxima and use pliers and vise grips to uncurl and remove the mounting brackets. Transfer the brackets to the new cable in the same positions. Leave the brackets slightly loose so you can fine tune them.


Connect the cables at the parking brake balance bar. There is no need to remove the Axxess parking brake handle. Attach the cable brackets to the body with the mounting bolts and connect the cable at each wheel.


Jack up the front of the car and support with stands to facilitate brake bleeding.


Now is a good time for a full brake fluid change. Use a syringe to drain the brake fluid reservoir or simply pump the fluid through one of the wheels if it looks clean enough. Fill the system with new dot3 fluid and use a bleeder bottle to get the air out at each wheel. Pump em up and crack the valve then retighten. Use that flare nut wrench you bought to save your bleeder valves and knuckles. Let it sit for a while and bleed em again. Bleeding order, left rear, right front, right rear, left front.


If the pedal is feeling firm then put the wheels back on and "bed" the brake pads by driving the car at 10mph and braking to 1mph, 5 times. Then do the same at 20mph to 1mph and then at 60mph to 1mph. Avoid any hard stops during the brake break in period. Test the parking brake and adjust it with the small nut hidden on top of the parking brake lever under the boot.


So how did it all work? It feels great driving and stops on a dime, especially with the front brake upgrade from earlier. I'm confident the rear disks will have less fade and better stopping power than the drums. In an informal test  performing a panic brake on gravel (pic below), the rear wheels did not lock up, which is good. During sustained braking tests the rear rotor got sizzling hot so they are working for sure.


The mix and match Maxima struts really fit perfectly. You can see the car body sits slightly low in front but the high wheel arch in front balances the look. Hopefully a set of lowering springs will take the car straight down so the rear wheels will tuck and the front will have a tiny fender gap.


It would be best to attach some high pressure brake gauges to each wheel to check the front to rear brake bias at different pedal pressures. Ideally a 50/50 bias is good at low pressures to preserve the front brakes but at higher pressures the fronts move to the 70/30 range to avoid rear lockup. In line proportioning valves and possibly an adjustment of the load sensing valve in the Axxess may be required, but for now the brakes seem quite good. We'll certainly need a 4 wheel alignment soon though.